How to Remove Silk Screen Print From Glass
SKIP TO HOW-TO
If you're anything like me, and I know you are, you thought screen printing was really hard. Something only magical hippies with a whack of cannabis could do. Not true! DIY screen printing is actually pretty easy and absolutely CRUCIAL for your DIY cred. It's like the gold standard or DIYers.

When I first started this little nod to the 60's adventure in 2012 I was ready to get all set up professional style. Build a light box, use all high end materials, maybe even get stoned and sell my wares out of the back of a Volkswagon camper van.
Then I didn't. I rationalized that I tend to go a bit extreme at times, and chances are .. you might not be willing to go to the edge with me. So I simplified everything about screen printing at home so that virtually anyone could do it no matter how much space or money you have.
As long as you have a 250v generator and a common counterfeiting machine in your house you'll be good to go.
Just kidding. You're just going to need a strong lightbulb, a couple of pieces of glass and some screen printing ink for you to try out this t shirt printing technique yourself at home.
How to Screen Print

In this tutorial I'm going to show you how to make your own screen printing frame, how to burn it and how to use your frames to screen print on any fabric.
So let me explain the type of screen printing I'll be showing you. It is screen printing with a light sensitive photo emulsion. In general terms, you paint a screen with light sensitive paint, let it cure, put your image on top of the paint when it's dried and cure it under lights.
The area of the screen that is covered up by your image will not get cured because it won't be exposed to light. Therefore after your screen is "exposed", all the area under your image will just wash away under water. This clean area in the shape of your image or text … is your screen printing pattern, where you will drag ink across to create your screen printed tee shirt, bag, or tea towel.
Yeah, see it was that kind of explanation that scared me away from trying screen printing in the first place.
Let's try again …
Materials
- a screen
- photo emulsion
- 150 watt lightbulb
- screen printing squeegee
- printer
- fabric paint (for screen printing)
- 2 pieces of glass (like those from a cheap picture frame)

These are your basic steps on how to screen print. I'll have a full step by step tutorial at the bottom of the post.
Pick & Print an Image
1. Decide on an image you want to print. For this tutorial I'm using a basic tree. For your first screen printing subject try something that's just a silhouette and one colour. Something like my tree or simple lettering is perfect.

2. Print your shape or letters onto a regular piece of paper. You can also print it on transparency paper but that's not necessary until you get to more detailed images. Carefully cut out the image with an Exacto knife.

TIP
When you get into more detailed images you'll want to invest in the transparency paper which you can buy on Amazon or at Staples. The image you print has to be OPAQUE because it needs to block all light from going through it. I
f you're unsure as to whether it's dark enough, hold your image up to the light. If light comes through, it isn't dark enough. Either print another copy and double them up on top of each other, or colour in your paper with a black marker.
3. Now you need to grab your frame. A screen printing frame is a wood or metal frame with "silk" on it. The silk is actually polyester. I recommend you buy your screen, but you CAN make your own by stapling "110" polyester mesh to a square wood frame.
You can buy 110 polyester mesh on Amazon or at a craft or art supply store store.
And for those of you that are confused I think at one point there was a slight difference between silk screening and screen printing, but now the two terms are used interchangeably. They're both pushing paint through a screen onto fabric.
How to Make a Frame.
- To make your own screen printing frame screw 2×2's together like I've done below. It doesn't need to be perfect, just solid and flat. This isn't the time to use up your warped wood.
- Then you staple your "silk" onto it so it's very tight.

3. To apply the silk just use a regular staple gun. Pull it tight, but not so tight that the silk rips through the staples. You can also fold the silk under so it isn't as likely to rip.
Make sure your staples are pressed right in because your screen needs to lay flat when you flip it over. Staples that aren't pushed right in will make the screen wobble.

4. Once your screen is stapled, trim the edges.

5. Tape the outside and inside of the silk so paint can't drip through. I'm using duct tape because that's what I had in my workshop. I don't recommend it, it's just what I had. I'd recommend you use painter's tape.
(update: since taking an advanced screen printing course I've learned that painters tape works great for this) and is indeed your best choice)

Even though I did, you shouldn't need to tape the inside of your frame. Because I made the frame on my own and the silk wasn't as tight as it could have been, I taped the inside to prevent ink from leaking. Again, if you buy your frame or just do a better job than I did making mine, you won't need to do this.

Which screen printing frame to buy?
You'll have two choices when buying a screen printing frame. Wood, or aluminum. Buy an aluminum frame. They're only a few more dollars and infinitely better.
This is a good, inexpensive starter frame.
Using Photo Emulsion
Now that your screen is ready, it's time to coat it with Photo Emulsion. This is the stuff that reacts to light, so you have to do this part in a dark room, close to where you'll be storing it to dry.
It must be stored until dry in a COMPLETELY dark room. Black. If you put it in a closet to dry, make sure light isn't getting through the cracks of the door. Hang a towel, or housecoat or flat monster on the door to block the cracks if you have to.
Your photo emulsion comes in 2 parts. The container you see here, plus a little bottle of stuff you have to add to it to activate it.
No big deal. Instructions are on the bottle. You just shake it up.
The photo emulsion is applied with a squeegee. You can either use a squeegee you own, or buy one at the craft store. They're cheap. Coincidentally, so am I.

1. In your dark room, run a bead of emulsion across the top of your screen.

2. With your squeegee, draw the emulsion down over the entire screen on both sides. You want the thinnest coat possible. Make sure you have a nice even coat, but work quickly. Do one side, then the other and then immediately put the screen in a dark area to dry.
3. Set it down horizontally, not vertically. Depending on how thin you put your emulsion on, drying will take 1-3 hours.
(update: Since taking an advanced screen printing course I've learned you can also turn a fan on low pointed at the screen to speed the drying time. With a fan it will take around half an hour to dry)

Exposing Your Screen
Once the screen has dried you can now transfer the image you want to screen print onto it. THIS is where people usually get stuck because most tutorials recommend you use a lightbox. You DON'T NEED A LIGHTBOX.
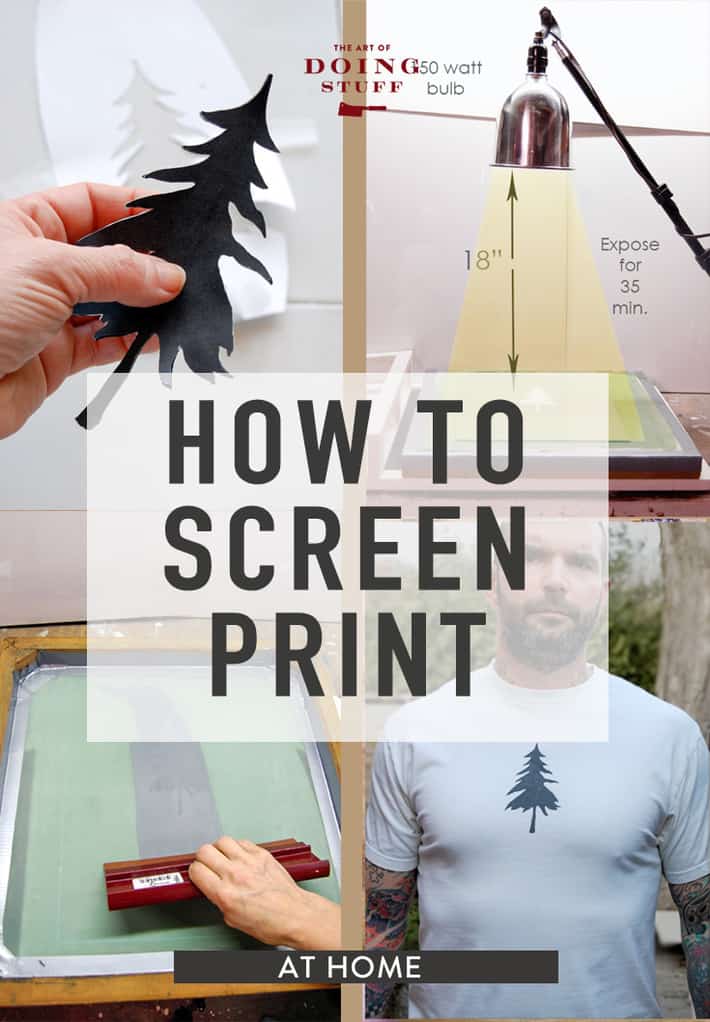
The best way for you to expose the screen is with a 150 watt lightbulb.
Your photo emulsion jar will tell you how long you should expose your image depending on the size of your screen. It will also give you the distance your light source should be from your screen.
I've rigged up one of my photography lights to use as my light source. It has a dome thingamabob on it, so this helps focus the light where I want it. If you do not have a dome thingamabob you can either McGyver one out of a tin pie plate, or expose your image for slightly longer.
You also need something that's matte black to put your screen on for the exposure. I've used an old chalkboard. A black piece of cardboard or bristol board would work well too.

1. Place a light with a 150 watt lightbulb shining down onto a black matte surface. Bristol board would work well.
2. Carry your dried screen with the emulsion on it over to your light area. Keep the screen covered with a towel to prevent light from hitting it until the second you're ready to expose it.
3. Place the prepared screen on your black matte background.The "back" of the screen (the non recessed part) will be facing up.
4. Place your cut out (or transfer paper printed) image onto the screen IN REVERSE.
TIP
Hold the image in your hand so you're looking at the image how you want to see it on your tee shirt, then flip it over and place it on the screen. You'll notice my image appears white now, because I've flipped it over and the dark portion of it is now touching the screen.
5. Place a clean piece of glass over the image to hold it tight against the screen.
6. Turn your light on. Expose for the required time.

Because of the screen size my image required 35 minutes of exposure with a 150 watt lightbulb set to 18″ away from the image. Yours may be different, but if your screen and image are around the same size as mine this exposure time and distance should work for you too.
From everything I read I figured this would be a disaster the first time. Most instructions say you'll fail the first time and not to be discouraged. It takes a while to figure out the right exposure time for your images.
However, this worked on the first try for me. Everything did actually, so you should be able to knock it out of the park on your first try too.
Set your timer and leave your image alone. Don't push, prod or bother it. Just go away and leave it alone.
Once the time is up, remove your glass and transparency or paper cutout. You'll see a faint image right away.
All of the emulsion surrounding your image is now cured hard. The spot where your image is, has not been cured and therefore will wash away.

7. Wash your screen with any high pressure tap. Your shower head or outdoor garden hose work well. Spray the screen with luke warm water focusing on the image area.Not hot, not cold.
Just keep spraying and eventually you'll see the image start to appear more and more as the emulsion washes away. You've just made your first silkscreen. You're very impressive. Eat a cookie.

How to Print (the fun part)
NOW IT'S THE FUN PART! You're going to lay your tee shirt (or whatever) out, place your newly burned screen onto it, run a line of paint and squeegee your first item. It's all very exciting.
Since this is your first time and maybe you don't have your technique down perfectly yet, plan to do a few test runs before. Practice over and over on an old tee shirt until you feel like you've got it under control. THEN move onto your real tee shirt.
1. Lay your tee shirt out and smooth it.

2. Put your newly created silk screen over your tee shirtso the recessed side of the screen is facing upwards.
IMPORTANT TIP – Taping your screen
Before printing, hold your screen up to a light source. If you see any pinholes where emulsion is missing from parts of the screen cover that area with a small piece of tape. This will stop ink from seeping through a place you don't want it to seep through.

3. Run a glug of paint across the top of your screen. My paint/ink is a mix of black and white to make a very, very dark grey. Your paint will dry MUCH darker than it appears when wet.
4. Drag the paint over your image with your squeegee without applying pressure . This is called flooding the image.

5. Then, going in the same direction, run over the image with the squeegee again with some pressure to push the ink through the screen on to the fabric.

6. You're done! CAREFULLY remove the screen from the tee shirt (it'll stick a little bit) by lifting it up.
7. Hang your piece to dry.
8. When you're done printing all your items, wash your screen right away by running cool water over it.
9. When the ink is very dry, heat set the image by pressing it with a dry iron.
TIP
If your print looks faded like this, just add more pressure to your squeegee the next time you print.

More pressure will get you a more solid image.

Hang your item to dry.

Here it is in video.
And that's it. How to screen print in 742 steps or less. It really isn't all that difficult and for what it takes in energy it more than gives back in fun.
Much like Dodgeball. Or shoving a lima bean up your friend's nose.
Materials
- Squeegee – $9
- Photo Emulsion – $10 (good for many, MANY screens)
- Ink – $8.00 (good for many, MANY tee shirts)
- Frame with screen – $20
- 150 watt lightbulb – $3
- Tee shirt - $5
Instructions
PICK AN IMAGE
- Decide on an image you want to print. For this tutorial I'm using a basic tree. For your first screen printing subject try something that's just a silhouette and one colour. Something like my tree or simple lettering is perfect.
- Print your shape or letters onto a regular piece of paper. You can also print it on transparency paper but that's not necessary until you get to more detailed images. Carefully cut out the image with an Exacto knife.
- Now you need to grab your frame. A screen printing frame is a wood or metal frame with "silk" on it. The silk is actually polyester. I recommend you buy your screen, but you CAN make your own by stapling "110" polyester mesh to a square wood frame. You can buy 110 polyester mesh on Amazon or at a craft or art supply store store.
MAKING A FRAME
- To make your own screen printing frame screw 2×2's together like I've done below. It doesn't need to be perfect, just solid and flat. This isn't the time to use up your warped wood.
- Staple your silk onto the frame with a regular staple gun, so it's very tight.
- Trim the edges the silk.
- Tape the outside of the silk onto the frame with painter's tape.
COATING WITH PHOTO EMULSION
-
Mix the 2 parts of the photo emulsion together. -
In your dark room,run a bead of emulsion across the top of your screen. - With your squeegee, draw the emulsion down over the entire screen on both sides. You want thethinnest coat possible. Make sure you have a nice even coat, but work quickly. Do one side, then the other and then immediately put the screen in a dark area to dry.
- Set it down horizontally, not vertically. Depending on how thin you put your emulsion on, drying will take 1-3 hours.
EXPOSING YOUR SCREEN
- Place a light with a 150 watt lightbulb shining down onto a black matte surface. Bristol board would work well.
- Carry your dried screen with the emulsion on it over to your light area. Keep the screen covered with a towel to prevent light from hitting it until the second you're ready to expose it.
- Place the prepared screen on your black matte background.The "back" of the screen (the non recessed part) will be facing up.
- Place your cut out (or transfer paper printed) image onto the screen IN REVERSE.
- Place a clean piece of glass over the image to hold it tight against the screen.
- Turn your light on. Expose for the required time. (instructions for required time will be on your box or bottle of photo emulsion)
- Wash your screen with any high pressure tap. Your shower head or outdoor garden hose work well.You're washing away the emulsion over your image. Use lukewarm water.
PRINTING!
- Lay your tee shirt out and smooth it.
- Put your newly created silk screen over your tee shirtso the recessed side of the screen is facing upwards.
- Run a glug of paint across the top of your screen. My paint/ink is a mix of black and white to make a very, very dark grey. Your paint will dry MUCH darker than it appears when wet.
- Drag the paint over your image with your squeegee without applying pressure . This is called flooding the image.
- Then, going in the same direction, run over the image with the squeegee again with some pressure.
- You're done! CAREFULLY remove the screen from the tee shirt (it'll stick a little bit) by lifting it up.
- Hang your piece to dry.
- When you're done printing all your items,wash your screen right away by running cool water over it.
- When the ink is very dry, heat set the image by pressing it with a dry iron.
Notes
- When you get into more detailed images you'll want to invest in the transparency paper which you can buy on Amazon or at Staples. The image you print has to be OPAQUEbecause it needs to block all light from going through it. If you're unsure as to whether it's dark enough, hold your image up to the light. If light comes through, it isn't dark enough. Either print another copy and double them up on top of each other, or colour in your paper with a black marker.
- You'll have two choices when buying a screen printing frame. Wood, or aluminum. Buy an aluminum frame. They're only a few more dollars and infinitely better. This is a good, inexpensive starter frame.
- If your print looks faded just add more pressure to your squeegee the next time you print.
This is the most basic of screen printings. If you get more into it you're going to want to buy or make a screen printing press and learn a lot more about grey scale printing of images.
IF all this DIY seems like a lot of work you can buy an entire starter screen printing starter kit that includes THE SCREEN, PHOTO EMULSION, FABRIC PAINTS, A SQUEEGEE and more.
Get the starter screen printing kit for $38 on Amazon US.
Get the starter screen printing kit for $67 on Amazon in Canada.
If you have any questions feel free to ask me. I probably won't answer them but I might chase you down and shove a lima bean up your nose.
→Follow me on Instagram where I often make a fool of myself←
How to Remove Silk Screen Print From Glass
Source: https://www.theartofdoingstuff.com/how-to-screen-printsilkscreening-at-home/
0 Response to "How to Remove Silk Screen Print From Glass"
Post a Comment